Wednesday, October 16, 2024

Day 1: A challenge to learn basics of Structural Equation Modeling (SEM) using lavaan and semPlot packages in R

During the next 12 days, I will learn and repeat the basics of structural equation modeling (SEM) using lavaan and semPlot packages in R.

You can search my lavaan posts by typing: #UsmanZafarParacha_lavaan , and semPlot posts by typing: #UsmanZafarParacha_semPlot

============

During this day, I will learn about the use of SEM in Psychology (Cognitive and Behavioral Research). The example is investigating the relationship between stress, self-esteem, and academic performance. For this example, the model is that stress negatively affects self-esteem, which in turn impacts academic performance. SEM helps to model the direct effect of stress on performance, as well as the indirect effect via self-esteem. A hypothetical dataset will be used.

Initially, lavaan and semPlot packages are loaded, and a hypothetical dataset is developed, using the following lines of codes:


library(lavaan)

library(semPlot)


# Create a sample dataset

set.seed(123) # For reproducibility

n <- 100 # Number of participants


data <- data.frame(

  stress = rnorm(n, mean = 50, sd = 10),          # Stress scores

  self_esteem = rnorm(n, mean = 70, sd = 10),     # Self-esteem scores

  academic_performance = rnorm(n, mean = 75, sd = 10) # Academic performance scores

)


# Check the dataset

head(data)


Then, we define the relationships between the variables. For instance, stress directly affects self-esteem, self-esteem directly affects academic performance, and stress indirectly affects academic performance through self-esteem. These relationships can be written as follows:


# Define the SEM model

model <- '

  # Direct effects

  self_esteem ~ stress

  academic_performance ~ self_esteem


  # Indirect effect via self_esteem

  academic_performance ~ stress

'

Then, the lavaan function is used to fit the model, using the following lines of codes:


# Fit the SEM model

fit <- sem(model, data = data)


# Check the summary of the model

summary(fit, fit.measures = TRUE, standardized = TRUE)


The summary provides important information, including path coefficients, standard errors, p-values, and fit indices like RMSEA, CFI, and TLI.


Then, the results are interpreted using the summary(fit) function. For instance, Path Coefficients show the strength and direction of relationships between variables; Significance check the p-values to determine whether relationships are statistically significant; and Fit Indices show Good model fit is indicated by RMSEA < 0.06, CFI > 0.95, and TLI > 0.95.


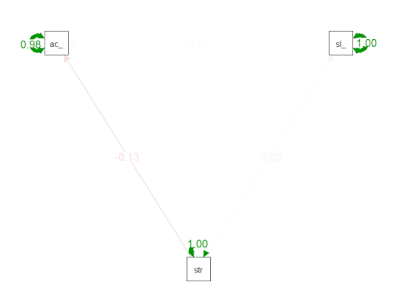
Then, the model is visualized with semPlot package, using the following lines of codes:


# Plot the SEM model

semPaths(fit, what = "std",

         layout = "tree",

         edge.label.cex = 1.2,

         sizeMan = 6,

         sizeLat = 8)


The model can also be modified using the following:

# Define a new SEM model with mediation

mediation_model <- '

  # Mediation

  self_esteem ~ stress

  academic_performance ~ self_esteem

  academic_performance ~ stress

'


# Fit the new model

mediation_fit <- sem(mediation_model, data = data)


# Summary with fit measures

summary(mediation_fit, fit.measures = TRUE, standardized = TRUE)


# Visualize the mediation model

semPaths(mediation_fit, what = "std",

         layout = "circle",

         edge.label.cex = 1.2,

         sizeMan = 6,

         sizeLat = 8)


Source:
ChatGPT

Pakistan’s current economic situation and real estate market forecasting

In the Pakistani Market, people are experiencing ups and downs. The same thing happens with real estate market during the past few years. More focusedly, it can be said that people who have invested in real estate have experienced losses during the past few years. Usually, businesses are linked to stability of the country. However, recently some changes have been made in the country.

During the years from 2020 to 2022, real estate market experienced a good boom. People purchased many properties leading to an increase in the rates of properties. For instance, people have also earned up to 100% to 150% profits. However, after that country’s condition worsened and economic went down.

During 2022, banks started increasing their interest rates, and by the mid of 2023, interest rates went to about 21%. This change in interest rates lead to the placement of money in banks by investors after taking money out of all other investment options. This placement of money in banks also resulted in an increase in banks’ businesses during the past two to three years. The interest rate, by the end of 2024, would go to 14% to 13%. Similarly, government bonds have also seen a decline in percentage.

Nevertheless, in Pakistan, it has been predicted that its economy would grow by about 3.2% in fiscal year 2025 (FY25) that is an increase from 2.4% last year. Some foreign investors have also started sending money to Pakistan.

All these aspects would lead to the movement of money from banks to economy and in different businesses. Similarly, big companies and corporates would also take their money from banks and put in different businesses.

Money would either go to Stock Market, but this market has also crossed its all time high, or to the real estate. In the case of real estate, people from overseas have also started showing their interest. So, this can be one of the best times to purchase property.

Source:
Takhleeq - Real Estate Market Update: Latest News & Impact | Takhleeq - https://www.youtube.com/watch?v=nz2YmkYo2tc

Post 26/30: VFX tutorial for Blender – Creating a Simple Character Rig in Blender


On Day 26, you'll begin rigging, which is the process of setting up a skeleton (armature) for your character to enable movement. Here's a step-by-step guide to help you rig a simple character.


Step 1: Preparing the Character

  1. Open Blender and either create a simple character (e.g., a cube character) or use a pre-existing 3D model.
  2. Switch to Object Mode if you're not already in it by pressing Tab.
  3. Ensure that your model is centered and in a neutral pose, as rigging is easiest when the character is aligned with the grid.

Step 2: Adding an Armature (Skeleton)

  1. Press Shift + A to bring up the Add menu.
  2. Navigate to Armature > Single Bone. This adds a bone to the center of your scene.
  3. Switch to X-ray mode to see the bone inside your mesh. Do this by selecting the armature, then enabling Viewport Display > In Front in the properties panel.

Step 3: Editing the Armature

  1. Switch to Edit Mode by selecting your armature and pressing Tab.
  2. Use the G key to grab and move bones, or the E key to extrude new bones from the current one. Start by positioning the bone inside the torso of your character.
  3. Create new bones by extruding from the base bone to form a basic skeleton for your character. For example:
    • Extrude upwards to create the spine.
    • Extrude outwards to create limbs (arms, legs).
    • Create additional bones for areas like the head and feet.

Step 4: Assigning Bones to Mesh (Parenting)

  1. Once your armature is complete, return to Object Mode.
  2. Select your character mesh, then hold Shift and select the armature.
  3. Press Ctrl + P and choose With Automatic Weights. This assigns the bones to the mesh, allowing the mesh to move with the bones.

Step 5: Testing the Rig

  1. Switch to Pose Mode by selecting the armature and pressing Ctrl + Tab.
  2. Select individual bones and use the G (move) or R (rotate) keys to test how the mesh deforms.
  3. Make adjustments by switching back to Weight Paint Mode if necessary, to ensure that parts of the mesh are properly influenced by the correct bones.

Shareable Visual:

Create a short video or screenshot showing your rigged character in a simple pose, demonstrating that the bones are correctly influencing the mesh.

Source:
ChatGPT

Day 22: Blender tutorial for making illustrations – Designing Interactive Diagrams (Clickable or Animated Paths)


Today, you will learn how to create interactive or animated diagrams in Blender. These diagrams will guide viewers through different paths, making your educational videos more engaging and interactive. You’ll animate elements that can trigger different actions, such as moving along a flowchart path or highlighting a section of a mind map.


Step-by-Step Guide:

1. Setting Up Your Scene

  • Open Blender and set up a new project.
  • Switch to 2D Animation mode by selecting it from the splash screen or creating a new 2D workspace.
  • Clear the default objects if necessary and start with a clean workspace.

2. Creating the Diagram Base

  • Use Grease Pencil to draw a flowchart, mind map, or any other educational diagram. You can create nodes using simple shapes like circles or squares and connect them with lines or arrows.
  • Add text labels to each node using the Text tool, explaining each part of your diagram.

3. Preparing the Animation

  • Select the elements (nodes and lines) that will be animated.
  • Create an animation timeline by opening the Dope Sheet and setting keyframes for your nodes and text.
  • For interactive paths, you’ll need to animate the movement between different sections. For instance, create animations that show a progression from one node to another using keyframes.
  • Add keyframes for movement (location), scaling, or rotation, depending on how you want elements to interact.

4. Adding Triggers and Interactivity

  • Path Animation: Use Bezier curves to define movement paths between nodes or sections. Convert a curve into a path and assign objects (like arrows or markers) to follow it.
  • In the Object Data Properties panel, under Path Animation, adjust the Frames to control how long it takes for the object to move from start to finish on the path.

5. Enhancing Interactivity with Visibility

  • You can animate visibility to create the effect of items appearing or disappearing as users "interact" with the diagram. Use keyframes on the Visibility property (found under the Object Properties panel).
  • For example, you can animate text to appear sequentially as viewers progress through different nodes.

6. Refining with Camera Movements

  • Add a camera and animate its movement using keyframes. You can move the camera from one section of the diagram to another, creating a dynamic and interactive feel.
  • Go to the Timeline, select the camera, and add keyframes to adjust its position and focal length to zoom in or out on different parts of the diagram.

7. Testing and Previewing

  • Use the Timeline to scrub through your animation and check the flow. Make sure that the interactive paths are smooth, and the timing feels natural.
  • Adjust the duration and easing of transitions to enhance user engagement.

8. Rendering the Animation

  • Once satisfied with the interaction and animation, go to the Render Properties tab.
  • Set your render output to the desired video format (e.g., MP4), adjust resolution, and select Output Folder to save your video.
  • Click on Render Animation to export your interactive diagram as a video.

9. Adding Sound or Voiceover

  • Import the rendered video into a video editing software (e.g., Blender’s Video Sequence Editor or another software of your choice).
  • Record and sync your voice narration to the animation, explaining each part of the diagram as it progresses.

Outcome:

  • By the end of Day 22, you will have created an interactive or animated flowchart or mind map that guides viewers through a process with animations that move along paths. This will be ready to include in your illustrative videos with voiceover narration.

Source:
ChatGPT

Monday, October 14, 2024

Post 25/30: VFX tutorial for Blender – Advanced Cloth Simulation (Interaction with Objects)

Goal: Learn how to simulate a cloth interacting with other objects in your scene for more realistic physics-based animations.


Step-by-Step Guide

  1. Open Blender: Start by opening Blender and creating a new project.
  2. Set Up Your Cloth Object:
    • Add a Plane: Go to the top menu, click on Add > Mesh > Plane. This will serve as your cloth.
    • Resize the Plane: Press S and move your mouse to scale the plane to the desired size for the cloth.
  3. Create an Object for the Cloth to Interact With:
    • Add a Sphere or Cube: Click on Add > Mesh > UV Sphere or Cube. This will be the object that the cloth interacts with.
    • Position the Object: Move the object below the plane by selecting it and pressing G (grab) and then Z to constrain movement along the Z-axis. Place it just underneath the plane.
  4. Apply Cloth Physics to the Plane:
    • Select the plane (cloth), then navigate to the Physics Properties panel (right-hand side menu, icon resembling bouncing ball).
    • Click Cloth under the physics types. This adds cloth simulation to the plane.
  5. Adjust Cloth Settings:
    • In the Cloth Physics tab, you can modify the default settings to get different results. For now, you can stick with the default settings but feel free to adjust Quality Steps for more detailed cloth behavior (increasing this value will make the simulation smoother but slower).
  6. Make the Object a Collision Object:
    • Select the object (e.g., the sphere or cube), go to the Physics Properties tab again, and this time click Collision.
    • This ensures that the cloth will collide with the object and not pass through it during the simulation.
  7. Simulate the Cloth Interaction:
    • Press Spacebar to play the animation. The cloth will fall and drape over the object due to gravity, simulating interaction between the cloth and the object.
  8. Fine-tune the Simulation:
    • Pause the simulation and tweak cloth properties under the Cloth Physics tab, such as Bending (for stiffness) or Damping (to control the energy lost during the motion).
    • You can also adjust the Collision settings under the object to change the way the cloth interacts with it.
  9. Add Lighting and Camera:
    • Add a Light Source: Go to Add > Light > Point or Sun and position it so that it illuminates the cloth and the object.
    • Set Up the Camera: Press Numpad 0 to view through the camera. Adjust the camera position and angle by selecting the camera and using G to grab and move it, or R to rotate it.
  10. Render the Simulation:
    • Once you're satisfied with the simulation, go to the Render Properties panel (camera icon on the right-hand menu).
    • Set up Output Settings like resolution and frame rate.
    • Render Animation: Once everything looks good, press F12 to render an image or Ctrl + F12 to render the animation.
  11. Shareable Visual:
    • Save the rendered animation or image and share it! Your result should be a visually realistic cloth draping and interacting with the solid object.

Source:
ChatGPT


Day 21: Blender tutorial for making illustrations – Syncing Audio and Visuals for Better Engagement

Today, you’ll focus on improving viewer engagement by syncing your voice narration with key visual elements in your Blender illustrations. Syncing audio and visuals helps guide the viewer through the material and ensures the narration complements the animations.

Step-by-Step Guide for Day 21:


Step 1: Prepare the Audio

  • Record the Voiceover: Use any audio recording tool (e.g., Audacity, your phone’s voice recorder) to record the narration that will accompany your video.
  • Save as WAV/MP3: Ensure your voiceover file is saved in a common format like .wav or .mp3 to import into Blender easily.

Step 2: Set Up Your Blender Scene

  • Open Blender: Start a new project or open your previous project with the illustration or flowchart.
  • Check Timeline & FPS: In the timeline at the bottom, check your frames-per-second (FPS) settings, which determines the smoothness of animation playback. For standard videos, set FPS to 24 or 30 frames per second.

Step 3: Import the Audio

  • Go to Video Sequence Editor:
    1. Change the workspace layout by switching to "Video Editing" from the top menu.
    2. In the lower half of the screen, switch the editor type to "Video Sequence Editor" to display your video editing timeline.
  • Add the Audio:
    1. Press Shift + A or click Add in the Video Sequence Editor.
    2. Select Sound and browse to your audio file (voiceover). This will add your narration into the timeline.

Step 4: Match Visuals with Audio

  • Scrub Through Audio: Move the playhead through your audio track to listen and find key moments where certain visuals should appear or move.
  • Add Keyframes for Sync:
    1. Select an object (e.g., text or shape) in your scene that needs to sync with the audio.
    2. Move the playhead to the exact frame where the object should appear or start animating.
    3. Press I to add a keyframe for the object (you can keyframe properties such as location, rotation, or visibility).
  • Adjust Timing: Use the timeline and move keyframes forward or backward until the visuals match the narration perfectly.
  • Tip: If you have multiple objects to sync, break down the audio in sections and animate each section one at a time.

Step 5: Fine-Tuning Sync

  • Add Transitions or Delays: To make transitions between visuals smoother, consider using Blender’s animation easing functions (like Ease In/Out) to make visuals appear or disappear gently.
  • Visual Cues for Important Points:
    1. Add emphasis to critical points in your narration by animating visual effects such as highlighting a text, zooming into a diagram, or changing the color of a flowchart element.
  • Test Playback: Play your animation with audio multiple times to see if everything is perfectly in sync.

Step 6: Adjust Audio Timing (If Necessary)

  • Trim or Shift Audio: If necessary, go back to the Video Sequence Editor and adjust the audio by moving it left or right on the timeline or trimming unnecessary parts.

Step 7: Export the Final Animation with Audio

  • Set Output Format: In the output properties (right-side panel), set your render format to an appropriate video format like FFmpeg for video and audio. Choose MPEG-4 under the Encoding options.
  • Render: Once everything is synced perfectly, go to Render > Render Animation to export your animation as a video with synced audio.

Outcome:

By the end of today, you will have successfully synced your voiceover with key visual moments in your animation, making the video more engaging and easier for viewers to follow.

This skill is crucial for creating educational videos that captivate the audience, helping them stay engaged with both your visuals and the concepts you explain through voiceovers.


Source:
ChatGPT


Five well-known societies in Islamabad, considering real estate business

(Source: Pixabay)

In Islamabad, some of the well-known societies include ParkView City, Capital Smart City, Lakeshore residencia, New City Paradise, and Kingdom Valley. All of these societies have already achieved their NOC, except ParkView City for which Phase 2 (extension) is going to be approved soon.

Capital Smart City is the project of Habib Rafiq Group, and is developing near new Airport. This project has also an approved its own interchange on Motorway. Most of the residential areas, amenities, and commercial areas have already been developed in this project. It has also started an Overseas West Block, which is also closely adjusted to interchange. DHA Gandhara project is also adjacent to this society. Nevertheless, the Overseas West project in this society has different options of plots, including 5 marlas, 7 marlas, 10 marlas, and 1 kanals.

ParkView City, Phase 2, also has residential plots of 5 marlas, 10 marlas, and 1 kanals. This plot has some of the most attractive amenities, such as dancing fountains and food court. The return on investment is also higher in this area. For instance, 5 marla plots were purchased by people in the price range of 35 lacs but now they are at a price of about 1 crore 30 lacs.

Lakeshore city is available near Khanpur Dam. It is such a project in which KPK is also interested. It is also one of the most beautiful projects. It has different plot options, including 5 marlas, 7 marlas, and 10 marlas.

The New City Paradise is near Burhan Interchange. It suits very much to the people from KPK and Hazara, or Wah Cantt. Or Attock. It’s 5 marla plots are attractive options.

Eventually, Kingdom Valley is a project developing at Chakri Road. It can also be considered one of the most marketed projects in Pakistan. A project, namely BlueWorld City, is also located near this project, but it was an unsuccessful project, despite the investments of overseas people, because of its NOC.

Source:

Saad Ali Khan - Big Discounts & Exclusive Real Estate Deals: Discover Islamabad's Top 5 Trending Housing Societies - https://www.youtube.com/watch?v=cDKeuWvaL5s