Monday, October 7, 2024

Post 17/30: VFX tutorial for Blender – Creating Smoke with Volume Effects (VFX in Blender)

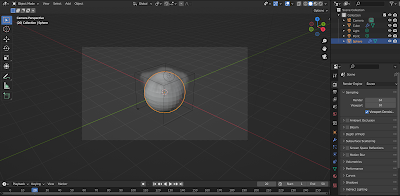
Goal: Today, you'll learn how to create realistic smoke effects in Blender using the smoke simulation system. This is a great way to simulate environments like industrial settings, campfires, or even volcanic eruptions.

Task Overview:

  • Set up a simple scene.
  • Use Blender’s volume effects to create smoke.
  • Tweak the smoke settings to get the desired look.
  • Render a shareable visual of a realistic smoke simulation.

Step-by-Step Tutorial:

1. Open Blender

  • Open Blender and start a new project.

2. Set Up the Scene

  • Delete the default cube (Select the cube and press X to delete).
  • Add a new object that will emit the smoke:
    • Go to the Add menu at the top or press Shift + A, then select Mesh > Sphere (you can use any object, but we’ll use a sphere for this tutorial).

3. Add a Smoke Simulation

  • Convert the sphere to a smoke emitter:
    • With the sphere selected, go to the Physics tab on the right panel.
    • Click on Fluid, and from the drop-down, select Smoke.
    • In the Smoke Type, select Flow. This tells Blender that the sphere will emit smoke.

4. Adjust Smoke Settings

  • In the Flow Type, ensure it is set to Smoke.
  • You can tweak additional settings here:
    • Temperature: This affects how fast the smoke rises (default is fine for now).
    • Density: Adjust to control how thick or light the smoke appears (default is good for basic smoke).

5. Add a Domain Object

  • Smoke simulations in Blender require a domain to contain the smoke.
    • Add a cube (Shift + A > Mesh > Cube) and scale it up (S key) so that it surrounds the sphere completely.
    • With the cube selected, go to the Physics tab and enable Fluid > Smoke. This time, set the Smoke Type to Domain.

6. Preview the Simulation

  • Press Play (Spacebar) to start the animation. You should see smoke start to emit from the sphere and fill the domain.
    • Tip: If the smoke appears too slow or fast, you can adjust the simulation time in the Domain settings under Time Scale.

7. Refine the Smoke Look

  • To make the smoke look more realistic, you can go to the Shading workspace (at the top of Blender).
    • Select the Render Properties tab and switch the Render Engine to Cycles for better results.
    • Under the Domain object's material settings, ensure you are using the Volume Scatter shader for more realistic smoke rendering.

8. Adjust the Lighting

  • For realistic smoke, you need good lighting:
    • Add a light source (Shift + A > Light > Sun or Area light).
    • Position the light to highlight the smoke.

9. Render the Simulation

  • Set up a camera to capture the smoke effect. You can add a camera by pressing Shift + A > Camera, then position it using G and R to adjust.
  • Go to the Render tab and click on Render Image or Render Animation if you want to render an animated sequence of the smoke.

10. Export and Share

  • Once the render is complete, save the image (F3 to save).
  • For animations, export the video as a .mp4 file to share.

Shareable Visual:

  • You now have a realistic smoke effect animation or still image ready to share. This could be a simple puff of smoke, an ongoing smoke cloud, or something more dynamic depending on how you adjusted the simulation.

This lesson helps you get familiar with Blender’s volume effects and provides you with a solid understanding of how to create smoke. This fundamental skill can be applied to larger VFX projects like fires, explosions, or even misty environments!

Source:
ChatGPT
Day 14: Blender tutorial for making illustrations - Exporting Your Illustrations as Videos in Blender


Welcome to Day 14 of your 30-day tutorial plan! Today, you'll learn how to export your Blender creations as video files, a crucial step to share your animated illustrations with your audience. By the end of this session, you'll be able to render and export your flowcharts, mind maps, brainstorms, and other illustrative videos.

Objectives:

  • Understand how to set up rendering in Blender
  • Learn how to export your animation as a video file
  • Get familiar with video formats and resolution settings
  • Generate a simple video from your animated diagram

Step 1: Set Up Your Scene for Rendering

Before you can export your project as a video, ensure that everything is in place and your scene is ready for rendering.

  1. Check Your Timeline:
    • Make sure all keyframes and animations are in place. Scrub through the timeline to preview your animation and ensure it's ready.
  2. Camera Setup:
    • Verify your camera angles. You can adjust your camera position by selecting the camera object in the scene and using G (grab) or R (rotate) to position it correctly.
    • Use 0 on your numpad to switch to the camera view and preview how your animation will appear.

Step 2: Choose Render Settings

  1. Open Render Properties:
    • On the right-hand side of the screen, find the Render Properties tab (the icon looks like a small printer).
  2. Set Render Engine:
    • Choose your render engine. For quick renders, Eevee is a fast, real-time rendering engine. For higher-quality renders, choose Cycles.
  3. Resolution:
    • Scroll to the Output Properties tab (the icon looks like a printer with a gear). Set the resolution of your video. For standard HD video, use 1920x1080 pixels.
  4. Frame Range:
    • Set the frame range of your animation. For example, if your animation lasts 5 seconds and your frame rate is 24 FPS (frames per second), you would set the range from 1 to 120.

Step 3: Select Output File Format

  1. Open Output Settings:
    • In the Output Properties tab, under the Output section, set the file path where you want to save your exported video. Click the folder icon to choose your save location.
  2. File Format:
    • In the same section, change the file format to FFmpeg video (this format is used for exporting video files).
  3. Encoding Options:
    • Scroll down to the Encoding section. Select Container as MPEG-4 (for .mp4 format).
    • Set Video Codec to H.264 for high-quality compression, which is ideal for YouTube uploads.

Step 4: Render the Animation

  1. Render Animation:
    • Once everything is set up, go to the top menu and click Render > Render Animation. Blender will start processing your frames and generating the video file.
  2. Monitor the Process:
    • You’ll see a pop-up window showing each frame as it's rendered. The process can take time, depending on the complexity of your animation and the length of the video.

Step 5: Review Your Video

  1. Locate the Exported File:
    • After rendering is complete, navigate to the folder you selected in the output settings to find your video file.
  2. Play the Video:
    • Open the video in your media player to review the animation. Make sure the visuals, timing, and smoothness meet your expectations.

Step 6: Adjustments and Re-Renders

If you're not happy with the result or notice any errors, you can go back to Blender, make adjustments, and re-render the animation.

  • Common Adjustments:
    • Frame rate issues: If your animation looks choppy, increase the frame rate or add more keyframes to smooth out the motion.
    • Lighting or color issues: Adjust lighting or material settings to improve the look of your visuals.
    • Resolution problems: If the quality isn’t sharp enough, check your resolution settings and re-render with higher settings.

Conclusion:

By the end of Day 14, you’ve successfully learned how to render and export your Blender animations as video files. Now, you can share your illustrative videos with others! Continue practicing this process as it becomes second nature while refining your skills in creating complex visual diagrams.

Source:
ChatGPT


Sunday, October 6, 2024

Post 28/30: Brokers can cheat with clients in real estate business

(Source: Pixabay)

I thought of learning about different aspects of Pakistan, as I want to do something for it. Therefore, I started with some of the well-known indices or reports that would help me in gaining more information about Strength, Weakness, Opportunity, Threat (SWOT). These were 12 posts. You can search my posts related to Pakistan by typing: #UsmanZafarParacha_Pakistan

Now, I have been learning about real estate business in Pakistan. I have started from Youtube videos and hopefully during my learning Journey, I will get some more useful resources to move ahead in this learning and perhaps entering into the real estate business.

I have seen a video, titled, “Fraud Alert | Big scame in real estate Pakistan | DHA Islamabad | Bahria town | Gulbarg green,” on the channel “Roznaama Property”.

The host shares that policies in Pakistan are among the reasons for the decline in real estate market. Moreover, the interest rates (which were increased) also resulted in a decline in this market. Another important reason is that people associated with the business of real estate are illegitimately taking the dues (haq) of other people. For instance, brokers often “eat” the rights of other people. These types of real estate agents often develop fake offices (with girls) calling people who want to sell or purchase property. The host shares that even about 4 years ago, the real estate market was rarely or not facing these types cheatings, but now the situation has been changed. Sometimes, dealers say to the clients that you can merge your plot in our projects and can get a good profit in return. Some of these cheaters often take big cars on rent to attract clients.

Follow my Hashtag #behtareenkitalaash on Youtube: https://www.youtube.com/hashtag/behtareenkitalaash

Sources:

Roznaama Property  - https://www.youtube.com/watch?v=jQqMQp_41sg


Saturday, October 5, 2024

Post 16/30: VFX tutorial for Blender – Camera Movements & Advanced Animation in Blender

Goal: Learn to animate the camera for dynamic shots and create a cinematic feel in your scene.

Step-by-Step Tutorial

1.     Open Your Scene:

    • If you’ve been working on a project from a previous day, open that file. Otherwise, create a simple scene using a few objects (e.g., a cube, sphere, or another shape of your choice).

2.     Add a Camera:

    • In the top menu, go to Add > Camera to place a camera in your scene. Alternatively, you can select the camera from the Shift + A shortcut and choose "Camera" from the menu.
    • Position the camera by moving and rotating it using the G (move) and R (rotate) keys to find the right angle.

3.     Set Camera as Active:

    • Press Numpad 0 to view through the camera.
    • If it’s not active, right-click the camera in the outliner and choose Set Active Camera.

4.     Create a Path for the Camera:

    • To animate a moving camera, you can either move it frame by frame or create a path for smooth camera movement.
    • Go to the top menu and select Add > Curve > Path. This will generate a path that the camera can follow.
    • Adjust the path by entering edit mode (Tab) and moving the control points to create the desired motion path for the camera.

5.     Parent the Camera to the Path:

    • Select the camera, then hold Shift and select the path.
    • Press Ctrl + P to parent the camera to the path and select Follow Path.
    • The camera will now move along the curve.

6.     Animate the Camera:

    • In the timeline, set your starting frame (e.g., frame 1). Then go to Object Properties while the camera is selected, and insert a keyframe for location and rotation.
    • Move to a later frame (e.g., frame 100) and adjust the camera's position or orientation. Insert another keyframe.
    • Scrub through the timeline to see the camera movement.

7.     Add Dynamic Camera Effects:

    • Go to the camera properties (select the camera, then check the camera icon in the right-hand toolbar).
    • Enable depth of field for more cinematic visuals by adjusting the focal length and the object in focus.
    • You can also experiment with motion blur by enabling it in the render settings.

8.     Render a Preview:

    • Press Ctrl + F12 to render a preview animation of your camera movement.
    • If needed, tweak the keyframes or path for smoother motion.

9.     Shareable Visual:

    • After rendering, you’ll have a short, cinematic animation where the camera smoothly moves through the scene, showcasing dynamic shots.

Tips for Improvement:

  • Try different camera angles and experiment with speed by adjusting the position of keyframes.
  • Use multiple cameras in the same scene to switch perspectives for a more dynamic animation.

This step will introduce you to camera animation, an essential aspect of VFX for creating engaging scenes.


Source:
ChatGPT


Post 15/30: VFX tutorial for Blender – Simulating Water (Basic Fluid Simulation) Tutorial


Goal: Create simple water simulations.

Step 1: Setting Up the Scene

1.     Open Blender:

    • Launch Blender and start a new project.

2.     Delete the Default Cube:

    • Right-click on the default cube and press X to delete it.

3.     Add a Domain Object:

    • Press Shift + A > Mesh > Cube. This will serve as the container for your fluid simulation.
    • Scale the cube up (press S and drag) to create a larger box that will contain the water.

4.     Set the Domain Object:

    • With the cube selected, go to the Physics Properties tab (the bouncing ball icon).
    • Click on Fluid and set the type to Domain. Set the domain type to Liquid.

Step 2: Adding the Fluid Object

5.     Create the Fluid Object:

    • Press Shift + A > Mesh > UV Sphere to create a sphere that will represent the water.
    • Scale the sphere down (press S) to make it smaller than the domain cube.

6.     Set the Fluid Properties:

    • With the sphere selected, go to the Physics Properties tab.
    • Click on Fluid and set the type to Flow. Change the flow type to Liquid.
    • In the flow settings, set the flow behavior to Inflow to make it continuously pour into the domain.

Step 3: Adjusting the Simulation Settings

7.     Adjust Domain Settings:

    • Select the domain cube and navigate to its Physics Properties.
    • Under the fluid settings, find the Cache section and set the type to All. Increase the end frame to around 100 for a longer simulation.
    • Optionally, set the resolution to 64 or higher for a smoother fluid simulation.

8.     Adjust the Flow Settings:

    • Select the sphere (fluid) again.
    • You can adjust the Flow Rate in the flow settings to control how much water is poured in.

Step 4: Baking the Simulation

  1. Bake the Simulation:
    • In the domain cube's Physics Properties, scroll down to the Cache section and click on Bake. This will calculate the fluid simulation.
    • Wait for the baking process to complete (this may take a moment depending on your settings).

Step 5: Setting Up the Materials

10.  Add Water Material:

    • Select the fluid (sphere).
    • Go to the Material Properties tab (the sphere icon) and click New.
    • Change the surface type to Principled BSDF. Adjust the Transmission value to 1.0 for a clear water effect. You can also adjust the Roughness for different effects (lower values for smooth water).

11.  Add Lighting:

    • Press Shift + A > Light > Area to add an area light to your scene.
    • Position it to illuminate the fluid well and adjust its strength in the light properties.

Step 6: Rendering the Scene

12.  Set the Camera:

    • Press Shift + A > Camera to add a camera.
    • Move it to a good vantage point to capture the fluid simulation (press G to grab and move it).
    • With the camera selected, press Ctrl + Alt + Numpad 0 to snap the camera to the current view.

13.  Render Settings:

    • Go to the Render Properties tab (the camera icon).
    • Choose your render engine (Cycles or Eevee). Cycles will give more realistic results but may take longer to render.
    • Adjust the resolution and output settings as desired.

14.  Render the Animation:

    • Press Ctrl + F12 to render the animation. Blender will output your animation based on your set resolution and settings.

Step 7: Share Your Work

15.  Export Your Animation:

    • After rendering, you can find the output video in your specified output directory.

16.  Create a Shareable Visual:

    • Use your rendered animation to create a short video to share on platforms like YouTube, Instagram, or your social media accounts.

Recap:

In this session, you've set up a basic fluid simulation to create a water pouring effect. You learned how to manipulate objects, apply fluid physics, and render your scene. With these skills, you can create engaging shareable visuals that demonstrate your progress in Blender!

Source:
ChatGPT


Day 13: Blender tutorial for making illustrations - Using Blender's Camera for Smooth Animations


Objective:

Create a smooth pan or zoom effect in your diagram to make your illustrations more engaging.


Step 1: Setting Up Your Scene

  1. Open Blender:
    • Start by launching Blender and opening your existing project with your illustrations (e.g., mind map, flowchart).
  2. Select Your Camera:
    • In the 3D viewport, press N to open the sidebar.
    • Click on the “View” tab and make sure you are in “Camera” view (Numpad 0). This allows you to see what the camera sees.

Step 2: Positioning the Camera

  1. Adjust Camera Position:
    • If the camera is not positioned well, select it (click on the camera icon) and use the G (grab) key to move it, R to rotate it, or adjust the properties in the sidebar under the camera's settings to frame your illustration.
  2. Set the Camera Lens:
    • In the Camera Properties panel (camera icon), adjust the focal length. A lower value gives a wider view, while a higher value gives a zoomed-in effect.

Step 3: Adding Keyframes for Animation

  1. Set Initial Keyframe:
    • With the camera selected, press I and choose “Location” to insert a keyframe for the camera's current position.
  2. Move the Timeline Indicator:
    • Move the timeline indicator (the blue vertical line) to frame 30 (or the desired time for your animation).
  3. Change Camera Position:
    • Move the camera to a new position that highlights another part of your illustration (again use G to grab and move).
    • Insert another keyframe by pressing I and selecting “Location” again.

Step 4: Adjusting Animation Settings

  1. Smooth Motion:
    • Go to the Timeline at the bottom of the window, click on the “Graph Editor” to adjust the easing of your animation for smooth transitions.
    • Select the keyframes and press T, then choose “Ease In” or “Ease Out” to create smoother starts and ends for your camera movement.

Step 5: Previewing Your Animation

  1. Play the Animation:
    • Press Space or use the play button in the timeline to preview your camera animation. Make adjustments as needed by moving the keyframes in the timeline or repositioning the camera.

Step 6: Rendering the Animation

  1. Render Settings:
    • Go to the Output Properties panel (printer icon) and set your desired resolution and frame rate.
    • Ensure the output folder is set correctly to save your video.
  2. Render the Animation:
    • Click on “Render” in the top menu and select “Render Animation” to create your animated video.

Outcome:

By the end of this tutorial, you will have created a smooth camera animation that dynamically showcases your illustrations, making them more engaging for your audience.


Source:
ChatGPT


Post 27/30: Three important pillars in the real estate business

(Source: Pixabay)

I thought of learning about different aspects of Pakistan, as I want to do something for it. Therefore, I started with some of the well-known indices or reports that would help me in gaining more information about Strength, Weakness, Opportunity, Threat (SWOT). These were 12 posts. You can search my posts related to Pakistan by typing: #UsmanZafarParacha_Pakistan

Now, I have been learning about real estate business in Pakistan. I have started from Youtube videos and hopefully during my learning Journey, I will get some more useful resources to move ahead in this learning and perhaps entering into the real estate business.

I have seen a video, titled, “Real Estate Investment in Pakistan | Real Estate Secrets Exposed | Analysis | June 2024” on the channel “CDB PROPERTIES”.

The host of the video discusses about three pillars in the real estate business. One of the pillars is seller side, one is the buyer side, and most important is real estate consultant. On the seller side, it is considered that whether seller wants to hold the property or the seller wants to sale the property with profit. A real estate consultant assures the proper fulfillment of dealing. Real estate consultants advise about the best time to sale or purchase a property. They also tells about everything, such as charges or taxes, etc, so that the seller may not find it difficult to deal with the situation.

Follow my Hashtag #behtareenkitalaash on Youtube: https://www.youtube.com/hashtag/behtareenkitalaash

Sources:

CDB PROPERTIES - https://www.youtube.com/watch?v=-hA4mQSWyVQ