Thursday, September 26, 2024

Post 8/30: VFX tutorial for Blender - Creating Basic VFX (Particle System Introduction)


Goal:

Explore the basics of Blender's particle system by creating a simple particle effect, such as a fountain of particles.


Step-by-Step Guide

Step 1: Open Blender

  1. Launch Blender and create a new project.

Step 2: Delete the Default Cube

  1. Select the default cube by right-clicking on it.
  2. Press X on your keyboard and confirm to delete it.

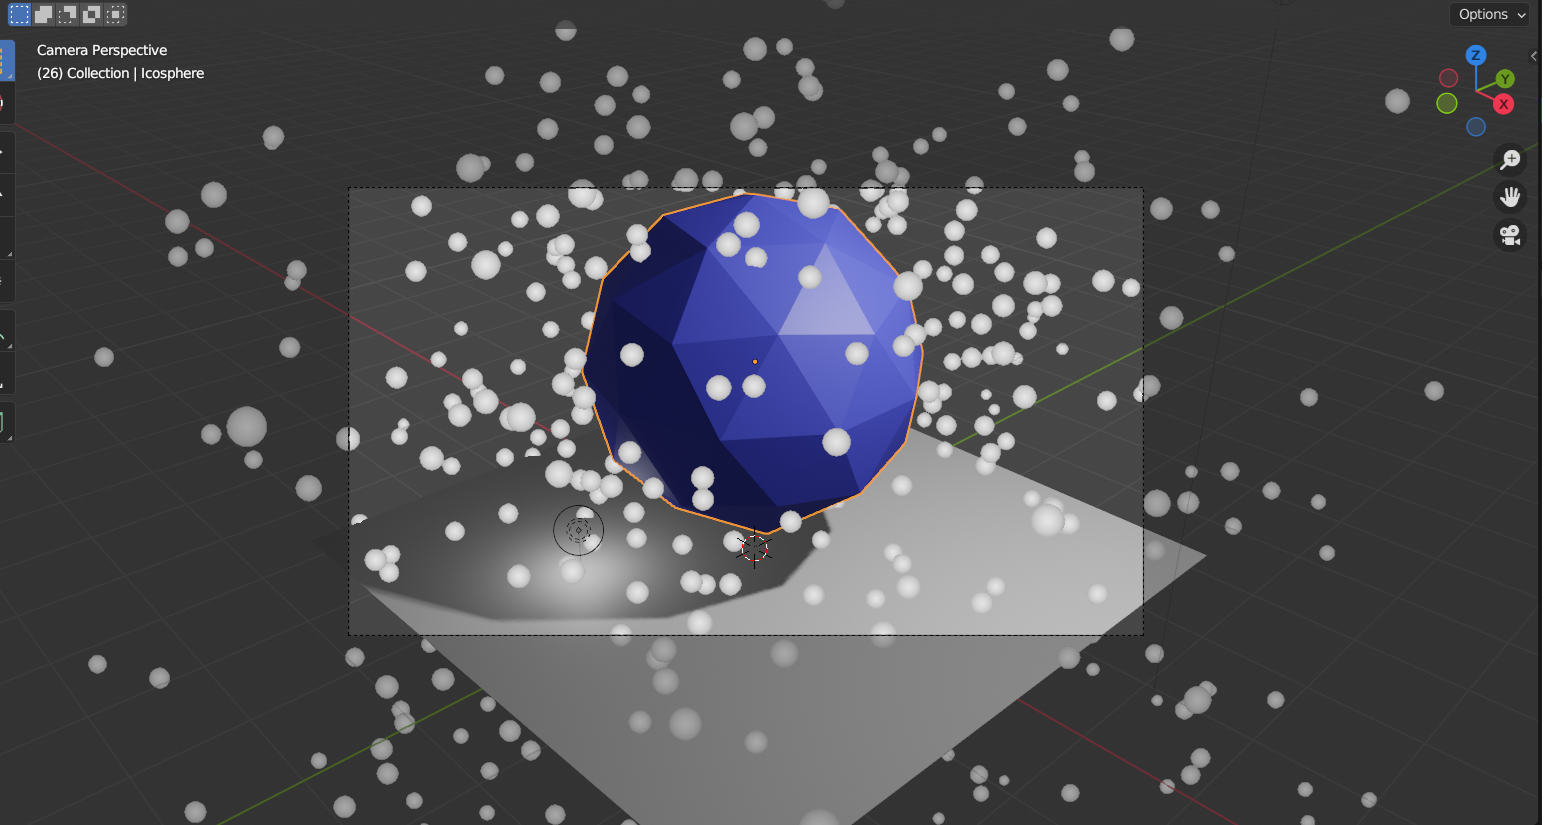
Step 3: Add a New Object for Particles

  1. Press Shift + A to open the Add menu.
  2. Navigate to Mesh and select Ico Sphere. This will serve as the emitter for your particle system.

Step 4: Scale the Ico Sphere

  1. With the Ico Sphere selected, press S and drag to scale it up slightly, making it more visible.
  2. Confirm the scale by left-clicking.

Step 5: Add a Particle System

  1. In the Properties panel on the right, click on the Particles tab (it looks like a spark icon).
  2. Click the + button to add a new particle system.

Step 6: Configure the Particle Settings

1.     Emission:

    • Set the Number of particles to around 1000.
    • Adjust Lifetime to about 50 frames.
    • Set Start to frame 1 and End to frame 50.

2.     Velocity:

    • Set Normal to around 5 to make the particles emit outward.
    • Adjust Random to add variability to the velocity.

3.     Render:

    • Under the Render section, change the Render As option to Halo or Object (you can use another small mesh like a UV Sphere for a more visible effect).

Step 7: Set Up the Emitter's Location

  1. Move the Ico Sphere up on the Z-axis (press G, then Z, and drag it up) so that the particles will emit from above the ground plane.

Step 8: Add a Ground Plane

  1. Press Shift + A and add a Mesh > Plane.
  2. Scale the plane up (S, then drag) so it’s large enough to catch the particles.

Step 9: Adjust the Particle Material

  1. Select the Ico Sphere.
  2. Go to the Material Properties (the sphere icon).
  3. Create a new material and adjust the color and transparency if desired (for example, set the Base Color to a light blue).

Step 10: Test the Particle Effect

  1. Press Spacebar or click Play to see the particle effect in action.
  2. Observe how the particles emit and fall to the plane.

Step 11: Add Lighting

  1. To enhance your scene, add a light source. Press Shift + A and choose Light > Point.
  2. Move the light to a suitable position to illuminate the particles effectively.

Step 12: Final Adjustments

  1. Tweak any particle settings for better visuals (adjust the number, lifetime, or velocity).
  2. Consider adding a slight rotation to the emitter under the Transform settings for dynamic effects.

Step 13: Render Your Scene

  1. Set up a camera (press Shift + A, select Camera).
  2. Position the camera to frame your scene.
  3. Go to the Render menu and select Render Image to see your particle effect.

Shareable Visual:

  • Save your rendered image as a PNG or JPEG.
  • Consider creating a short animation (Render Animation) and save it as an MP4 for sharing.

Wrap-Up

By the end of Day 8, you should have a basic understanding of Blender's particle system and created a simple, shareable particle effect. Feel free to experiment with different settings and add more complexity to your scene as you become more comfortable!


Source:
ChatGPT


Day 6: Blender tutorial for making illustrations - Introduction to Layers and Organizing Elements


Objective: Create a simple mind map from scratch while learning to use layers in Blender to organize different components effectively.


Step-by-Step Guide

1. Open Blender:

  • Start a new Blender project by opening Blender and selecting "General" from the splash screen.

2. Set Up Your Scene:

  • Delete the default cube by selecting it and pressing X to delete it.

3. Create Basic Nodes:

  • Add a Circle:
    • Press Shift + A to open the Add menu.
    • Select Mesh > Circle. This will be your first node.
  • Resize the Circle:
    • Press S to scale it down slightly, if needed.
  • Duplicate for More Nodes:
    • With the circle selected, press Shift + D to duplicate it. Move the duplicate to a new position.
    • Repeat this to create a few more circles to represent your mind map nodes.

4. Add Text Labels:

  • Create Text:
    • Press Shift + A and select Text.
  • Edit Text:
    • With the text object selected, go to the Properties Panel (press N if it’s not visible).
    • Under the Text tab, change the text to label your nodes (e.g., “Main Idea,” “Subtopic 1,” etc.).
  • Position the Text:
    • Move the text close to its corresponding node using the G key (grab) to position it.

5. Create a Collection for Organization:

  • Go to the Outliner (top right panel).
  • Right-click and select New Collection. Name it “Mind Map.”
  • Drag and drop all your circles and text objects into this new collection.

6. Create Connecting Lines:

  • Add a Line:
    • Press Shift + A and select Mesh > Cylinder.
  • Resize and Position:
    • Scale the cylinder down along the Z-axis (S, then Z).
    • Move it to connect two nodes.
  • Duplicate Lines:
    • Duplicate the line for other connections between nodes as needed.

7. Organize Lines into a Collection:

  • In the Outliner, create another collection named “Lines.”
  • Move all your connecting lines into this collection.

8. Color the Elements:

  • Select a node or line, go to the Material Properties (the sphere icon in the Properties Panel).
  • Click New to create a new material, and adjust the base color to your preference.
  • Repeat this for each node and line for better visual distinction.

9. Use Layers to Manage Visibility:

  • Press M while an object is selected to move it to a different layer.
  • Organize your elements by moving some nodes to one layer and others to a different layer.

10. Save Your Work:

  • Go to File > Save As and save your project with an appropriate name (e.g., “Mind_Map_Scratch.blend”).

Outcome

By the end of this session, you should have a basic mind map structure organized into layers and collections. This setup will allow you to easily edit, animate, or enhance your visuals in future sessions.

Source:
ChatGPT


Post 20/30: Difference between Registry and “Inteqal” (mutation) in Real Estate

(Source: Pixabay)

I thought of learning about different aspects of Pakistan, as I want to do something for it. Therefore, I started with some of the well-known indices or reports that would help me in gaining more information about Strength, Weakness, Opportunity, Threat (SWOT). These were 12 posts. You can search my posts related to Pakistan by typing: #UsmanZafarParacha_Pakistan

Now, I have been learning about real estate business in Pakistan. I have started from Youtube videos and hopefully during my learning Journey, I will get some more useful resources to move ahead in this learning and perhaps entering into the real estate business.

I have seen a video, titled, “Difference Between Registry and Inteqal in Pakistan |Registry vs Mutation |رجسٹری اور انتقال Ł…ŪŒŚŗ فرق” on the channel “Legal Opinion Law Chambers”

The author says that when you purchase a property and you transfer that to your name, it refers to registry. However, it is not always necessary that you purchase a property, as sometimes, someone (such as parents) may give you their property as a gift. This gift is referred to as gift deed (not sale deed). There is also a surrendered deed, in which you pass your property to someone. This is also a registered document.

When you purchase a property and it transfers to your name, it has to be registered in the registrar office. It is referred to as registry. It is a valid document, in which there is a stamp, and you pay duties, such as FBR duty. After all these actions, the property transfers to your name. So, you become the owner of that property.

The other thing is that of “inteqal” (mutation) for which there is record in the revenue department. Usually, inteqal is considered in the context of tax collection. So, initially some person was the owner of a property and now it has been transferred to your name. Initially, they were paying taxes, and now you will have to pay taxes. This process is usually under the authority of “patwari”. “Inteqal” can take place only after registry. Nevertheless, ownership is considered on registered sale deeds, as per the rulings of court, and “inteqal” is only a revenue collection document.

Follow my Hashtag #behtareenkitalaash on Youtube: https://www.youtube.com/hashtag/behtareenkitalaash

Sources:

Legal Opinion Law Chambers - https://www.youtube.com/watch?v=QxtqqWeBj1k


Wednesday, September 25, 2024

Post 7/30: VFX tutorial for Blender - Introduction to Modifiers (Subdivision Surface)


Goal: Learn how to use modifiers to change the appearance of objects, specifically the Subdivision Surface modifier to smooth out objects.

Step-by-Step Tutorial:

1.     Open Blender and Set Up a New Project:

    • Open Blender and start a new project. You can use the default cube or delete it and add a different shape (such as a sphere or cone) by pressing Shift + AMesh → Select your shape.

2.     Select the Object:

    • Right-click or left-click (depending on your setup) to select the object in your scene that you want to smooth.

3.     Open the Modifiers Tab:

    • On the right-hand side of the screen, find the Modifiers tab (a small wrench icon). Click on it to access the modifiers options.

4.     Add the Subdivision Surface Modifier:

    • With your object selected, click on Add Modifier in the Modifiers tab.
    • From the drop-down menu, select Subdivision Surface under the Generate category.

5.     Adjust the Subdivision Levels:

    • In the Subdivision Surface modifier options, you will see settings for View and Render levels.
      • The View level controls how smooth the object appears in the viewport.
      • The Render level controls how smooth the object will be when rendered.
    • Increase these levels to smooth out your object. Start with a View level of 2 or 3 for a moderate smoothness.

6.     Apply or Preview the Modifier:

    • If you are happy with the smoothed look of your object, you can apply the modifier by pressing the Apply button in the modifier panel. However, for this tutorial, you can leave it as a preview without applying it.

7.     Refine with Shading:

    • To further smooth the appearance, right-click on your object in the viewport and select Shade Smooth. This will make the object’s surface look smoother.

8.     Adjust Lighting and Camera:

    • Set up your lighting to highlight the smooth surfaces. You can add a Sun light (Shift + A → Light → Sun) and position it to create interesting shadows.
    • Adjust the camera by selecting it, pressing G to move, and R to rotate, framing your object.

9.     Render the Scene:

    • Press F12 to render the scene and check out your smoothed object.

10.  Save Your Render:

  • Once your render is complete, go to ImageSave As and export your image to share it.

Shareable Visual:

A smoothly subdivided 3D object with clean edges and soft shading, rendered with appropriate lighting and camera angles.

What You’ve Learned:

  • How to apply and adjust the Subdivision Surface modifier to smooth out objects.
  • Basic understanding of modifiers in Blender.
  • Smoothing techniques using the Shade Smooth function.

Source:
ChatGPT


Day 5: Blender tutorial for making illustrations - Basic Animation Techniques in Blender


Objective:

Learn the basics of animating simple elements in Blender, such as moving or rotating a shape, to create an engaging animated diagram.


Step-by-Step Guide:

1.     Open Blender and Set Up Your Workspace

    • Open Blender and ensure you're in the "Layout" workspace for animation.
    • Familiarize yourself with the Timeline panel at the bottom, where you'll control the animation sequence.

2.     Create a Basic Diagram

    • Use 2D shapes (circles, squares, etc.) to create a basic diagram. You can reuse the mind map from Day 3 or create a simple flowchart with a few shapes.
    • Add Text to label your shapes (e.g., “Start,” “Process,” “End”).

3.     Switch to Animation Mode

    • Select an object (shape or text) in your diagram.
    • Go to the Object Properties tab and focus on the Transform section (for moving, scaling, or rotating the object).
    • Move your playhead to Frame 1 in the Timeline.

4.     Set Keyframes for Movement

    • To animate the position of an object, press I while hovering over the Location property in the Object Properties tab. This creates a keyframe for the starting position at Frame 1.
    • Move the playhead to a later frame (e.g., Frame 40). Now, move the object to a new position using G (Grab) to drag it to the desired location.
    • Press I again to insert a keyframe for the new position at Frame 40.

5.     Animate Rotation

    • Select an object and press R to rotate it. Insert a keyframe for Rotation at Frame 1 using the I key.
    • Move to a later frame (e.g., Frame 60), rotate the object, and press I again to create another rotation keyframe.

6.     Preview Your Animation

    • Press Spacebar to play the animation. You should see your objects move and rotate between the keyframes.
    • Adjust the timing or smoothness by dragging keyframes in the Timeline.

7.     Add More Animation (Optional)

    • You can animate text appearing or disappearing by keyframing its Visibility (use the Outliner or keyframe the object's scale to make it “grow” from nothing).

8.     Refine the Animation

    • Use Interpolation Modes for smoother motion:
      • Select your keyframes in the Timeline.
      • Right-click and select Interpolation Mode > Bezier for a smooth curve in the motion.

9.     Render Your Animation

    • Once satisfied with the animation, go to the Render Properties tab.
    • Set the Output Format to FFmpeg video (to export as a video).
    • Choose a file destination under the Output section.
    • Press Ctrl+F12 to render the animation.

Outcome:

You will have created a simple animated diagram with moving and/or rotating elements, ready for use in your illustrative videos!

Let me know if you need further help!


Source:

ChatGPT


Bayes' Theorem - Educational Content